Attribution
This tutorial is a derivative of the Angular Tour Of Heroes App and Tutorial under CC BY 4.0..
There are new requirements for the Tour of Heroes app:
- Add a Dashboard view.
- Add the ability to navigate between the Heroes and Dashboard views.
- When users click a hero name in either view, navigate to a detail view of the selected hero.
- When users click a deep link in an email, open the detail view for a particular hero.
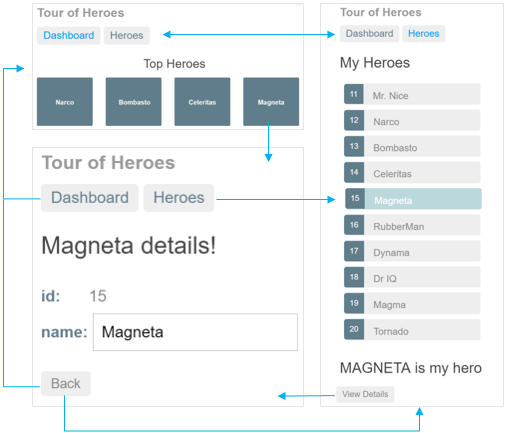
- When you’re done, users will be able to navigate the app like this:
Routing is built in to Blazor. It is managed by the Router component, which you have already looked at when you changed the default layout in the App component. Here is the code for the Router as it currently is:
<Router AppAssembly="@typeof(Program).Assembly">
    <Found Context="routeData">
        <RouteView RouteData="@routeData" DefaultLayout="@typeof(TourOfHeroesLayout)" />
    </Found>
    <NotFound>
        <LayoutView Layout="@typeof(TourOfHeroesLayout)">
            <p>Sorry, there's nothing at this address.</p>
        </LayoutView>
    </NotFound>
</Router>
The Router component is the parent to two other components: Found and NotFound. As their names indicate, the Found component is responsible for managing content when the incoming URL is matched. The NotFound component serves responses when no match is found.
Routes
Routes tell the Router component which view to display when a user clicks a link or pastes a URL into the browser address bar. The @page directive is used to specify that a component is intended to act as a view, i.e. that it should be executed when its route matches the URL. The component's route is specified in a template that follows the @page directive. You have already seen this when you created the Heroes component:
@page "/heroes"
Navigation
Ideally, users should be able to click a link to navigate rather than pasting a route URL into the address bar. Navigation can be managed via HTML anchor elements. Blazor also provides a NavLink component that provides the added benefit of applying an active CSS class to the link that matches the current URL.
Add a navigation link (NavLink)
Add a
<nav>element to the TourOfHeroesLayout component and, within that, a Navlink component that, when clicked, triggers navigation to the Heroes component. The revised TourOfHeroesLayout code looks like this:@inherits LayoutComponentBase <h1>Tour Of Heroes</h1> <nav> <NavLink href="/heroes" Match="NavLinkMatch.All">Heroes</NavLink> </nav> @BodyThe
Matchparameter on the NavLink component determines when the CSS activeclassis applied to the anchor element. TheNavLinkMatch.Allenum specifies that the whole of the URL should match.Add the following styles to the app.css file:
nav a {
    padding: 5px 10px;
    text-decoration: none;
    margin-top: 10px;
    display: inline-block;
    background-color: #eee;
    border-radius: 4px;
}

    nav a:visited, a:link {
        color: #334953;
    }

    nav a:hover {
        color: #039be5;
        background-color: #cfd8dc;
    }

    nav a.active {
        color: #039be5;
    }
Run the site by pressing Ctrl+F5. Now, instead of having to manually enter the
/heroesURL in the browser address bar, you can simply click the navigation link that appears:
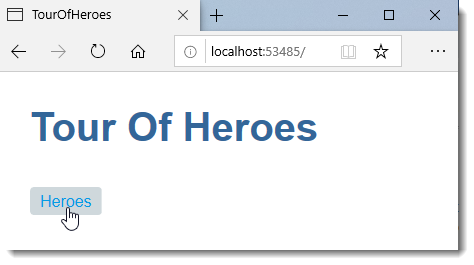
Add a dashboard view
Routing makes more sense when there are multiple views. So far there's only the heroes view.
Delete the Pages/Index.razor file.
Add a new Razor component to the Pages folder named Dashboard.razor
Replace the templated content in the Dashboard component with the following:
@page "/"
@page "/dashboard"

@inject IHeroService heroService
<h2>Dashboard</h2>
<div class="dashboard">
    <h3>Top Heroes</h3>
    <div class="grid grid-pad">
        @foreach (var hero in heroes)
        {
            <div class="module hero col-1-4">
                <h4>@hero.Name</h4>
            </div>
        }
    </div>
</div>
<Messages />

@code {
    List<Hero> heroes { get; set; } = new List<Hero>();

    protected override async Task OnInitializedAsync()
    {
        var data = await heroService.GetHeroes();
        heroes = data.Take(4).ToList();
    }
}
Add the following to the site.css file:
[class*='col-'] {
    float: left;
    padding-right: 20px;
    padding-bottom: 20px;
}

    [class*='col-']:last-of-type {
        padding-right: 0;
    }

.dashboard a {
    text-decoration: none;
}

*, *:after, *:before {
    -webkit-box-sizing: border-box;
    -moz-box-sizing: border-box;
    box-sizing: border-box;
}

.dashboard h3 {
    text-align: center;
    margin-bottom: 0;
}

.dashboard h4 {
    position: relative;
}

.grid {
    margin: 0;
}

.col-1-4 {
    width: 25%;
}

.module {
    padding: 20px;
    text-align: center;
    color: #eee;
    max-height: 120px;
    min-width: 120px;
    background-color: #3f525c;
    border-radius: 2px;
}

    .module:hover {
        background-color: #eee;
        cursor: pointer;
        color: #607d8b;
    }

.grid-pad {
    padding: 10px 0;
}

    .grid-pad > [class*='col-']:last-of-type {
        padding-right: 20px;
    }

@media (max-width: 600px) {
    .module {
        font-size: 10px;
        max-height: 75px;
    }
}

@media (max-width: 1024px) {
    .grid {
        margin: 0;
    }

    .module {
        min-width: 60px;
    }
}
Add a link to the dashboard in the TourOfHeroesLayout component:
@inherits LayoutComponentBase
<h1>Tour Of Heroes</h1>
<nav>
    <NavLink href="/heroes" Match="NavLinkMatch.All">Heroes</NavLink>
    <NavLink href="/dashboard" Match="NavLinkMatch.All">Dashboard</NavLink>
</nav>
@Body
When you relaunch the application, the default view shows the dashboard. You can navigate to the heroes view, and back to the dashboard via the navigation links. The text in the "dashboard" link is coloured differently when you use the link to navigate. The URL changes to http://localhost:xxxx/dashboard.
You can reach the dashboard at both / and /dashboard, because Razor components support multiple route templates.
Navigating to hero details
The HeroDetail component displays details of a selected hero. At the moment the HeroDetail component is only visible at the bottom of the Heroes component
The user should be able to get to these details in three ways.
- By clicking a hero in the dashboard.
- By clicking a hero in the heroes list.
- By pasting a "deep link" URL into the browser address bar that identifies the hero to display.
In this section, you'll enable navigation to the HeroDetail component and liberate it from the Heroes component. When the user clicks a hero item in the Heroes component, the app should navigate to the HeroDetail component, replacing the heroes list view with the hero detail view. The heroes list view should no longer show hero details as it does now.
Open the Heroes component template (Pages/Heroes.razor) and delete the
<HeroDetail>element from the bottom of the markup section. Clicking a hero item now does nothing. You'll fix that shortly after you enable routing to the HeroDetail component.Open the HeroDetail component and add the following to the top of the file:
@page "/detail/{id:int}"This is a parameterised route. The part in the curly braces
{ }is the parameter placeholder. The name of the parameter isidand it is followed by a data type constraint, separated by the colon. The constraint ensures that only values of the specified type (in this case,int) will match the route.Now that the HeroDetail component is navigable, fix the dashboard hero links to navigate via the parameterised dashboard route by adding a NavLink component:
<h3>Top Heroes</h3>
<div class="grid grid-pad">
    @foreach (var hero in heroes)
    {
        <NavLink class="col-1-4" href="@($"/detail/{hero.Id}")" Match="NavLinkMatch.All">
            <div class="module hero">
                <h4>@hero.Name</h4>
            </div>
        </NavLink>
    }
</div>
You're using string interpolation to generate the
hrefattribute value, passing the current hero'sIdvalue to theidparameter in the route.Amend the Heroes component by removing the
onclickandclassattributes from the<li>element, and adding NavLink components. Tidy up the@codeblock to remove the redundantonSelectmethod and theselectedHeroproperty. The amended code should look like this:@page "/heroes" @inject IHeroService heroService <h2>My Heroes</h2> <ul class="heroes"> @foreach (var hero in heroes) { <li> <NavLink href="@($"/detail/{hero.Id}")" Match="NavLinkMatch.All"> <span class="badge">@hero.Id</span> @hero.Name </NavLink> </li> } </ul> <Messages /> @code { List<Hero> heroes { get; set; } = new List<Hero>(); protected override async Task OnInitializedAsync() { heroes = await heroService.GetHeroes(); } }
Routable HeroDetail component
Previously, the parent Heroes component set the HeroDetail component hero property and the HeroDetail component displayed the hero. Heroes component doesn't do that anymore. Now the router creates the HeroDetail component in response to a URL such as ~/detail/11.
The HeroDetail component needs a new way to obtain the hero-to-display. This section explains the following:
- Get the route that created it
- Extract the id from the route
- Acquire the hero with that id from the server via the HeroService
To begin, add a new method signature to the
IHeroServiceinterface,GetHero:public interface IHeroService { Task<List<Hero>> GetHeroes(); Task<Hero> GetHero(int id); }Add an implementation of the method to the
HeroService:public async Task<Hero> GetHero(int id) { messageService.Add($"HeroService: fetched hero id={id}"); return await Task.Run(() => { return heroes.Find(h => h.Id == id); }); }Inject the
HeroServiceinto the HeroDetail component:@page "/detail/{id:int}" @inject IHeroService heroService @if (hero != null) ...Modify the
@codeblock to remove the[Parameter]attribute andpublicmodifier from theheroproperty, add a parameter namedId, and obtain the hero from theHeroServiceinstead:@code{ Hero hero { get; set; } [Parameter] public int Id { get; set; } protected override async Task OnInitializedAsync() { hero = await heroService.GetHero(Id); } }
Try it
When you re-run the application, you can click a hero in the dashboard or in the heroes list and navigate to that hero's detail view.
If you paste localhost:xxxx/detail/11 in the browser address bar, the router navigates to the detail view for the hero with id: 11, "Dr Nice".
Find the way back
By clicking the browser's back button, you can go back to the hero list or dashboard view, depending upon which sent you to the detail view. It would be nice to have a button on the HeroDetail view that can do that.
Add a go back button to the bottom of the component template and bind its onclick handler to the JavaScript window.history.go method:
@if (hero != null)
{
    <h2>@hero.Name.ToUpper() Details</h2>
    <div><span>Id: </span>@hero.Id</div>
    <div>
        <label>
            Name:
            <input @[email protected] />
        </label>
    </div>
    <button class="clear" onclick="window.history.go(-1); return false;">Back</button>
    <Messages/>
}
Re-run the application and start clicking. Users can navigate around the app, from the dashboard to hero details and back, from heroes list to the mini detail to the hero details and back to the heroes again. And each time, the messages component adds information about the actions that you took.
Summary
- You defined simple routes, and a parameterised route as templates provided to the
@pagedirective. - You used the NavLink component to generate anchor elements.
- You refactored a tightly-coupled master/detail view into a routed detail view.
- You used route parameters to navigate to the detail view of a user-selected hero.
- You shared the HeroService among multiple components.
Previous: Services
Next: HTTP
