Attribution
This tutorial is a derivative of the Angular Tour Of Heroes App and Tutorial under CC BY 4.0..
A data-driven single page application needs to obtain data from somewhere. Often the application will also need to store newly added or modified data too. Usually, the data is stored centrally on a remote database with the data being made available over HTTP via a Web-based API.
In this tutorial, you'll add the following data persistence features with help from Blazor's HttpClient.
- The
HeroServicegets hero data from a Web API with HTTP requests. - Users can add, edit, and delete heroes and save these changes over HTTP.
- Users can search for heroes by name.
You will implement basic services over HTTP using .NET Core's Web API framework. You will simulate a central database using Entity Framework Core's in-memory database system.
Enable HTTP services
HttpClient is Web Assembly Blazor's mechanism for communicating with a remote server over HTTP. It is an implementation of the .NET Core HttpClient API that uses the Fetch API to make asynchronous requests. HttpClient is registered as a service with the dependency injection system. You probably noticed its registration when you registered the HeroService. Enabling HTTP services in a particular component or class is simply a question of injecting it.
Restructure the application
The application needs restructuring. You will add two new projects to the solution:
One is an ASP.NET Core Web API application that will service requests over HTTP, and the other is a class library, housing the existing Models and Services classes, so that they can be referenced by other projects. You will work on that first.
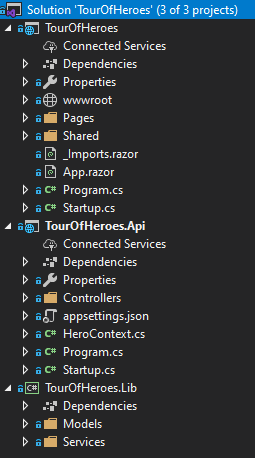
Creating the Shared project
- Create a new project by pressing Ctrl+Shift+N, and then choosing C# Class Library(.NET standard) from the available options. Name the project TourOfHeroes.Lib. Change the options so that the project is added to the current solution.
- Delete the Class1.cs file that comes as part of the template.
- Move the Models and the Services folders from the TourOfHeroes project to the newly created TourOfHeroes.Lib project.
- Update the namespaces in the class and interface files in the Models and Services folders to
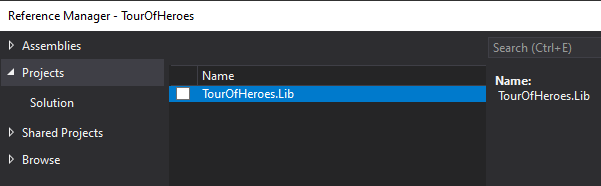
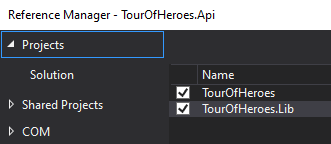
TourOfHeroes.Lib.ModelsandTourOfHeroes.Lib.Servicesto reflect their new location. - Right click on the TourOfHeroes project and choose Add → Reference... and then choose TourOfHeroes.Lib from the Projects listing:
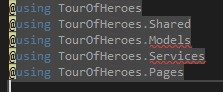
- Amend the TourOfHeroes _Imports.razor
usingdirectives to correct the errors, pointing instead toTourOfHeroes.Lib.ModelsandTourOfHeroes.Lib.Services:
- Do the same in Startup.cs in the TourOfHeroes project:
using Microsoft.AspNetCore.Components.Builder;
using Microsoft.Extensions.DependencyInjection;
using TourOfHeroes.Lib.Services;
...
When you build the project (press Ctrl+Shift+B), you should get no errors. If you do, retrace your steps to ensure that all references and using directives have been updated. If you run the application, it should work in exactly the same way that it did previously. The only difference is that you have changed the location of the models and services.
Create the Web API project
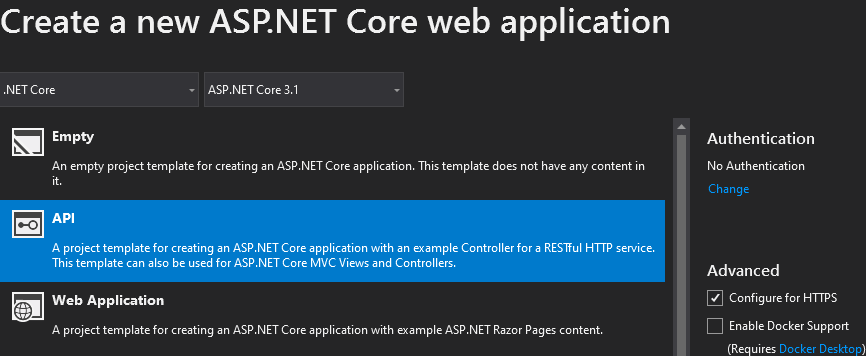
Right click on the solution in Solution Explorer and choose Add → New Project. Choose ASP.NET Core Web Application from the available options and name the project TourOfHeroes.Api:
Delete the WeatherForecast.cs and the Controllers/WeatherforecastController.cs files from the project.
Add project references to the TourOfHeroes and TourOfHeroes.Lib projects:
<ItemGroup>
  <ProjectReference Include="..\TourOfHeroes.Lib\TourOfHeroes.Lib.csproj" />
  <ProjectReference Include="..\TourOfHeroes\TourOfHeroes.csproj" />
</ItemGroup>
Right-click on the Controllers folder and choose Add → New Scaffolded Item. Then select Api Controller - Empty from the options presented to you. Name it HeroController.cs. This action might take a minute or two because it includes references being added to the project for Entity Framework Core, as well as some design-time tooling.
Next, you will install the Microsoft.EntityFrameworkCore.InMemory package from Nuget. This provides functionality for working with an in-memory database. You won't use this as a permanent data store in production. It is designed purely for unit testing and scenarios such as this tutorial. There are a number of ways to install a package:
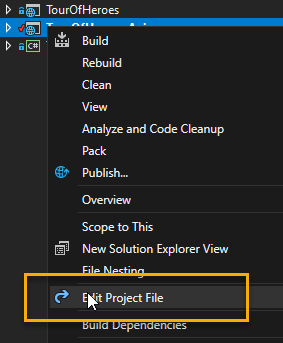
- Edit the project file (TourOfHeroes.Api.csproj) and add a new
<PackageReference/>node. The project file is not visible in Solution Explorer. You can access it by right-clicking on the project, and choosing Edit Project file:
<ItemGroup> <PackageReference Include="Microsoft.EntityFrameworkCore.InMemory" Version="3.1.4" /> </ItemGroup> - Use the Package Manager Console to execute the
install-packagecommand (Tools → NuGet Package Manager → Package Manager Console), ensuring that TourOfHeroes.Api is selected as the default project:

install-package Microsoft.EntityFrameworkCore.InMemory - Use the Solution Package Manager tool to search for the package and install it (Tools → NuGet Package Manager → Manage Packages For Solution)
- Use the .NET CLI tool to install the package via the
add packagecommand:
add package Microsoft.EntityFrameworkCore.InMemory
Choose one of these options and install the package.
- Edit the project file (TourOfHeroes.Api.csproj) and add a new
Add a new class file to the root of the API project and name it HeroContext.cs. Replace the code with the following:
using Microsoft.EntityFrameworkCore;
using TourOfHeroes.Lib.Models;

namespace TourOfHeroes.Api
{
    public class HeroContext : DbContext
    {
        public HeroContext(DbContextOptions<HeroContext> options) : base(options)
        {

        }
        public DbSet<Hero> Heroes { get; set; }

        protected override void OnModelCreating(ModelBuilder modelBuilder)
        {
            modelBuilder.Entity<Hero>().HasData(
                new Hero { Id = 11, Name = "Dr Nice" },
                new Hero { Id = 12, Name = "Narco" },
                new Hero { Id = 13, Name = "Bombasto" },
                new Hero { Id = 14, Name = "Celeritas" },
                new Hero { Id = 15, Name = "Magneta" },
                new Hero { Id = 16, Name = "RubberMan" },
                new Hero { Id = 17, Name = "Dynama" },
                new Hero { Id = 18, Name = "Dr IQ" },
                new Hero { Id = 19, Name = "Magma" },
                new Hero { Id = 20, Name = "Tornado" }
            );
        }
    }
}
This class derives from
DbContext, which is Entity Framework Core's main entry to a database. It includes oneDbSetproperty, which represents a table in a relational database.Code, borrowed from the
HeroServiceclass that generates a collection of heroes, is applied to theHasDatamethod in theOnModelCreatingmethod. This is used for "seeding" a database with initial data.Once you have installed the package successfully, open the Startup.cs file in TourOfHeroes.Api, and add a
usingdirective forMicrosoft.EntityFrameworkCore, together with the highlighted lines of code in theConfigureServicesmethod:public void ConfigureServices(IServiceCollection services) { services.AddControllers(); services.AddDbContext<HeroContext>( options => options.UseInMemoryDatabase(databaseName: "Heroes") ); }This code configures the
DbContextto use an in-memory store with the name of "Heroes". It also makes the context available throughout the application as a service. So in the next steps, you will inject it onto an API controller.Open the HeroController.cs file and replace the existing content with the following:
using Microsoft.AspNetCore.Mvc;
using Microsoft.EntityFrameworkCore;
using System.Collections.Generic;
using System.Threading.Tasks;
using TourOfHeroes.Lib.Models;

namespace TourOfHeroes.Api.Controllers
{
    [Route("api/[controller]")]
    [ApiController]
    public class HeroController : ControllerBase
    {
        private readonly HeroContext heroContext;
        public HeroController(HeroContext heroContext)
        {
            this.heroContext = heroContext;
            heroContext.Database.EnsureCreated();
        }

        [HttpGet]
        public async Task<IEnumerable<Hero>> Get()  => await heroContext.Heroes.ToListAsync();

        // GET: api/Default/5
        [HttpGet("{id}", Name = "Get")]
        public async Task<Hero> Get(int id) => await heroContext.Heroes.FindAsync(id);
    }
}
Here, you have injected the
HeroContextinto the controller. You can do this because theHeroContexthas been registered as a service. As well as assigning theHeroContextinstance to a private field in the controller constructor method, you called theDatabase.EnsureCreatedmethod. This method will create the database if it doesn't already exist, and execute theHasDatamethod, populating the database with the seed data.The first
Getmethod takes no parameters and returns all heroes in the database. The secondGetmethod takes anintas a parameter, returning the hero that has anIdvalue corresponding to the parameter value.
Changing the HeroService
The existing HeroService generates and delivers fake data. You have two choices at this point. You can either modify the existing HeroService to call the Web API to obtain data, or you can create a new HeroService that calls the API. You will take the second approach because it provides an opportunity to demonstrate how easy it is to swap implementations based on the same interface in a live app.
Add the System.Net.Http.Json package to the TourOfHeroes.Lib project.
Add a new class file to the Services folder in the TourOfHeroes.Lib project. Name the file HttpHeroService.cs.
Replace the existing content with the following code, ensuring that your replace the
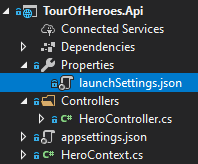
xxxxxin the highlighted line with the correct SSL port number. You can get this from theiisSettingssection of the launchSettings.json file, which is located by expanding the Properties node in the TourOfHeroes.Api project in Solution Explorer:
using System.Collections.Generic;
using System.Net.Http;
using System.Net.Http.Json;
using System.Threading.Tasks;
using TourOfHeroes.Lib.Models;

namespace TourOfHeroes.Lib.Services
{
    public class HttpHeroService : IHeroService
    {
        private readonly IMessageService messageService;
        private readonly HttpClient httpClient;
        private const string url = "https://localhost:xxxxx/api/hero";

        public HttpHeroService(IMessageService messageService, HttpClient httpClient)
        {
            this.messageService = messageService;
            this.httpClient = httpClient;
        }

        public async Task<List<Hero>> GetHeroes()
        {
            messageService.Add("HTTP HeroService: fetched heroes");
            return await httpClient.GetFromJsonAsync<List<Hero>>(url);
        }

        public async Task<Hero> GetHero(int id)
        {
            messageService.Add($"HTTP HeroService: fetched hero id ={id}");
            return await httpClient.GetFromJsonAsync<Hero>($"{url}/{id}");
        }
    }
}
The
MessageServiceis injected and records messages specific to the HTTP service. These messages will provide the most obvious evidence that the new service is being used to get heroes. theHttpClientinstance is used in both methods to call the Web API, and the responses are deserialised into theHerotype.Open the Program.cs file in the TourOfHeroes project, and change the registration of the
IHeroServiceto use theHttpHeroServicethat you just created:builder.Services.AddSingleton<IHeroService, HttpHeroService>(); builder.Services.AddSingleton<IMessageService, MessageService>();
Adjust the API project
A couple of modifications are required to the TourOfHeroes.API project because it is going to become the host for the original client application.
First, add the Microsoft.AspNetCore.Components.WebAssembly.Server package to the API project.
Change the
Configuremethod in Startup.cs to include the highlighted lines so that it looks like this:public void Configure(IApplicationBuilder app, IWebHostEnvironment env) { if (env.IsDevelopment()) { app.UseDeveloperExceptionPage(); app.UseWebAssemblyDebugging(); } app.UseHttpsRedirection(); app.UseBlazorFrameworkFiles(); app.UseStaticFiles(); app.UseRouting(); app.UseAuthorization(); app.UseEndpoints(endpoints => { endpoints.MapControllers(); endpoints.MapFallbackToFile("index.html"); }); }The changes result in middleware being added to the app that enable debugging and the serving of static files and Blazor WebAssembly framework files. The last line directs requests that don't match endpoints in the API application to the client application.
Modify the launchSettings.json file to replace
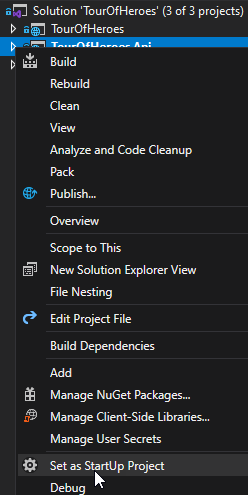
launchUrlwith the highlightedinspectUriin both the IIS Express and TourOfHeroes.Api profiles:"IIS Express": { "commandName": "IISExpress", "launchBrowser": true, "inspectUri": "{wsProtocol}://{url.hostname}:{url.port}/_framework/debug/ws-proxy?browser={browserInspectUri}", "environmentVariables": { "ASPNETCORE_ENVIRONMENT": "Development" } }Ensure that the API project is set as the Startup project:
When you run the application, it appears to work as before, except that now, the messages are clearly coming from the HTTP version of the HeroService:
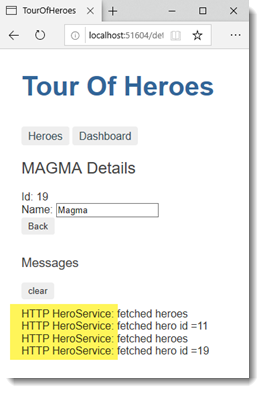
This illustrates the benefits of separating data access code out to a service, and using dependency injection to make services available to consuming classes. You still have the old version of the service available should you ever need it, and you didn't have to touch any code at all in the Razor components in order to change how the data is accessed.
Update heroes
When you edit a hero's name in the hero detail view, the hero name updates the heading at the top of the page. But when you click the "go back button", the changes are lost.
If you want changes to persist, you must write them back to the server.
- In the HeroDetail component, add a save button with a click event binding that invokes a new component method named
saveand import theNavigationManagerservice:@page "/detail/{id:int}" @inject IHeroService heroService @inject NavigationManager NavigationManager @if (hero != null) { <h2>@hero.Name.ToUpper() Details</h2> <div><span>Id: </span>@hero.Id</div> <div> <label> Name: <input @[email protected] /> </label> </div> <button class="clear" onclick="window.history.go(-1); return false;">Back</button> <button class="clear" @onclick=save>Save</button> <Messages /> } - Staying in the HeroDetail component, add the following
save()method to the@codeblock, which persists hero name changes using the hero serviceSave()method and then navigates back to the Heroes view:@code{ Hero hero { get; set; } [Parameter] public int Id { get; set; } protected override async Task OnInitializedAsync() { hero = await heroService.GetHero(Id); } private async Task save() { await heroService.Save(hero); NavigationManager.NavigateTo("heroes"); } } - Add the following method signature to the
IHeroServiceinterface:Task Save(Hero hero); - Add this implementation to the
HttpHeroService:public async Task Save(Hero hero) { messageService.Add($"HTTP HeroService: updated hero id ={hero.Id}"); await httpClient.PutAsJsonAsync(url, hero); } - Add a no-op implementation of the
Savemethod to the originalHeroService, because it no longer satisfies the contract specified by the interface that it implements:
You may also need to addpublic Task Save(Hero hero) => throw new NotImplementedException();using System;to the namespaces at the top of the file. - Finally, add the folllowing method to the HeroController.cs file in the API project:
[HttpPut]
public async Task Put([FromBody]Hero hero)
{
    heroContext.Update(hero);
    await heroContext.SaveChangesAsync();
}
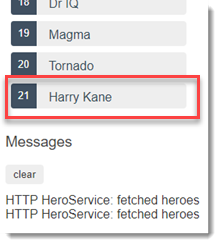
Any changes that you make to the hero in the details view will be passed to the save method. The modified hero makes its way to the Web API PUT method where the changes are persisted to the database. On successful completion of the operation, the NavigationManager service is used to redirect to the Heroes view, where the change is visible:

The PUT method is usually used for edits/updates in REST-based services because it is intended to be used for idempotent operations, i.e. ones that produce the same outcome regardless how many times they occur.
Add a new hero
To add a hero, this app only needs the hero's name. You can use an <input> element paired with an add button.
- Insert the following into the Heroes component template, just after the heading:
This step binds a<div> <label>New Hero:</label> <input @bind=newHero.Name /> <button class="clear" @onclick=add> Add</button> </div>Heroinstance to the textbox, and theonclickevent to a method namedadd. - Add the highlighted lines to the
@codeblock:
The@code { List<Hero> heroes { get; set; } = new List<Hero>(); Hero newHero { get; set; } = new Hero(); protected override async Task OnInitializedAsync() { heroes = await heroService.GetHeroes(); } private async Task add() { if (!string.IsNullOrEmpty(newHero.Name)) { await heroService.Add(newHero); heroes = await heroService.GetHeroes(); newHero = new Hero(); } } }newHeroproperty and theaddmethod are defined in the@codeblock. Theaddmethod checks to see of anything has been entered into the textbox, and then calls a method in theHeroService(which has yet to be added), passing it the new hero. Then the existingheroesproperty is re-initalised, as is thenewHeroproperty, which has the effect of clearing the form. - Add the following method signature to the IHeroService interface:
Task Add(Hero hero); - Provide a no-op implementation in the
HeroService:public Task Add(Hero hero) => throw new NotImplementedException(); - Add the following implementation to the
HttpHeroService:public async Task Add(Hero hero) { messageService.Add("HTTP HeroService: added new hero"); await httpClient.PostAsJsonAsync(url, hero); } - Add the following method to the HeroController:
[HttpPost]
public async Task Post([FromBody]Hero hero)
{
    heroContext.Add(hero);
    await heroContext.SaveChangesAsync();
}
Now run the application. Navigate to the Heroes view and enter a name for a new hero. When you clock Add, the component updates and your new hero (if you have to ask, Google him) is added to the list:
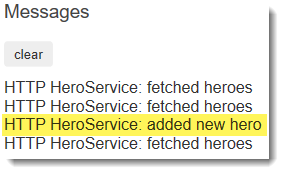
However, something is not working. If you look at the messages, there is nothing about adding a new hero, although you can see that one has definitely been added. When you re-assigned the heroes property in the add method, the StateHasChanged method for the Heroes component was automatically called by the framework. This caused the component to update. However, child components (in this case, the Messages component) are not updated. You have to manage that yourself.
Refreshing a child component
- Open the Messages component and add an
@codeblock with the following code:@code { public void Update() => StateHasChanged(); } - Now go back to the Heroes component and amend the
<Messages/>tag to include an@refattribute:<Messages @ref=messages /> - Add the highlighted lines to the
@codeblock in the Heroes component:@code { List<Hero> heroes { get; set; } = new List<Hero>(); Hero newHero { get; set; } = new Hero(); Messages messages { get; set; } protected override async Task OnInitializedAsync() => heroes = await heroService.GetHeroes(); private async Task add() { if (!string.IsNullOrEmpty(newHero.Name)) { await heroService.Add(newHero); heroes = await heroService.GetHeroes(); messages.Update(); newHero = new Hero(); } } }
This time, when you re-run the application, the expected message appears:
This approach makes use of Component References. It involves adding an @ref attribute to the child component, and then defining a field with the same type as the child component. One you have that reference, you can call public methods on the child component. In this case, there is one public method (Update) that explicitly calls the component's StateHasChanged method, resulting in it rerendering itself.
Delete a hero
Each hero in the heroes list should have a delete button.
- Add the following button element to the Heroes component template, after the hero name in the repeated
<li>element.
Notice that the@foreach (var hero in heroes) { <li> <NavLink href="@($"/detail/{hero.Id}")" Match="NavLinkMatch.All"> <span class="badge">@hero.Id</span> @hero.Name </NavLink> <button class="delete" title="delete hero" @onclick=@(e => delete(hero.Id))>x</button> </li> }deletemethod that's applied to the click event only takes theIdof the hero. - To position the delete button at the far right of the hero entry, add some CSS to site.css
button.delete { position: relative; left: 194px; top: -32px; background-color: gray !important; color: white; } - Add the
delete()handler to the@codeblock in the Heroes component:
The component delegates hero deletion to theprivate async Task delete(int id) { await heroService.Delete(id); heroes = await heroService.GetHeroes(); messages.Update(); }HeroService. It also obtains the remaining heroes from the service and invokes the Messages component's Update method. - Next, add a
Deletemethod signature toIHeroServiceinterface:Task Delete(int id); - Add a no-op implementation to the
HeroService:public Task Delete(int id) => throw new NotImplementedException(); - ...and an operational implementation to the
HttpHeroService:public async Task Delete(int id) { messageService.Add($"HTTP HeroService: deleted hero id ={id}"); await httpClient.DeleteAsync($"{url}/{id}"); } - Finally, add a method to the
HeroController:
This method makes use of a stub, which is the recommended way to work with deletes in a disconnected environment. Rather than passing the entire entity from the application to the server, you only pass its unique key value, then construct a new[HttpDelete("{id}")] public async Task Delete(int id) { var hero = new Hero { Id = id }; heroContext.Remove(hero); await heroContext.SaveChangesAsync(); }Heroinstance with that key value. It is passed to theRemovemethod as a proxy for the entity.
Run the application and try the new delete functionality.
Search by name
In this last exercise, you will add a heroes search component to the Dashboard. As the user types a name into a search box, you'll make repeated HTTP requests for heroes filtered by that name.
You will also take a different approach to component authoring. In this exercise, you will separate the processing logic that you have placed in an @code block thus far to a "code behind" file.
Start by adding a
Search()method to theIHeroServiceinterface:Task<List<Hero>> Search(string term);Followed by a no-op implementation in the original
HeroService:public Task<List<Hero>> Search(string term) => throw new NotImplementedException();And an implementation that works in the
HttpHeroService:public async Task<List<Hero>> Search(string term) { return await httpClient.GetFromJsonAsync<List<Hero>>($"{url}/{term}"); }Now you need to add an endpoint to the Web API controller:
[HttpGet("{term}")]
public async Task<IEnumerable<Hero>> Get(string term) => await heroContext.Heroes.Where(h => h.Name.Contains(term)).ToListAsync();
This method takes the search term and returns all heroes whose name contains the term. It is a case-sensitive search when using the in-memory database provider.
You also need to adjust the original
Getmethod that returns a single hero:[HttpGet("{id:int}")] public async Task<Hero> Get(int id) => await heroContext.Heroes.FindAsync(id);The change is in the route template definition - you added a constraint to the parameter to specify that it must be an integer -
"{id:int}". This is needed because the new method that you just added also takes a single parameter (term), which is a string. You need to use a constraint to disambiguate the routes.
Create HeroSearch Component
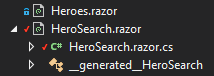
Add a new Razor Component to the Pages folder in the TourOfHeroes project. Name it HeroSearch.razor.
Add a C# class file to the Pages folder. Name the file HeroSearch.razor.cs. This is the "code behind" file. IDEs that support file nesting will show the class file as a child of the component file:
The concept of code behind files are familiar to ASP.NET Web Forms and Razor Pages developers. Moving processing logic to a separate class makes it a lot easier to unit test.Replace the content of the code behind file with the following:
using Microsoft.AspNetCore.Components;
using System.Collections.Generic;
using System.Threading.Tasks;
using TourOfHeroes.Lib.Models;
using TourOfHeroes.Lib.Services;

namespace TourOfHeroes.Pages
{
    public class HeroSearchBase : ComponentBase
    {
        [Inject]
        private IHeroService heroService { get; set; }

        protected List<Hero> Heroes { get; set; } = new List<Hero>();
        protected async Task Search (string term) => Heroes = await heroService.Search(term);
    }
}
The class is named
HeroSearchBaseand derives fromComponentBase. You have used constructor injection to provide services to other C# classes previously, but that is not supported in a class that derives fromComponentBase. You have to use the[Inject]attribute instead.The
Searchmethod calls theHeroServicesearch method and assigns the result to theHeroproperty.Open the HeroSearch component and replace the existing code with the following:
@inherits HeroSearchBase

<div id="search-component">
    <h4><label for="search-box">Hero Search</label></h4>

    <input id="search-box" @oninput=@(e => (string)e.Value != string.Empty? Search((string)e.Value) : null) />

    @if (Heroes.Any())
    {
        <ul class="search-result">
            @foreach (var hero in Heroes)
            {
                <li>
                    <NavLink href="@($"/detail/{hero.Id}")" Match="NavLinkMatch.All">
                        @hero.Name
                    </NavLink>
                </li>
            }
        </ul>
    }
</div>
The
@inheritsdirective in the first line is what marries the code behind to the component. The search box has a handler bound to its oninput event, which fires whenever a change takes place in the textbox, as opposed to the change event, which only fires when the textbox loses focus. The handler invokes theSearchmethod (declared in the code behind) passing it the current value.Add the following CSS to the site.css file:
.search-result li {
    border-bottom: 1px solid gray;
    border-left: 1px solid gray;
    border-right: 1px solid gray;
    width: 195px;
    height: 16px;
    padding: 5px;
    background-color: white;
    cursor: pointer;
    list-style-type: none;
}

    .search-result li:hover {
        background-color: #607D8B;
    }

    .search-result li a {
        color: #888;
        display: block;
        text-decoration: none;
    }

        .search-result li a:hover {
            color: white;
        }

        .search-result li a:active {
            color: white;
        }

#search-box {
    width: 200px;
    height: 20px;
}


ul.search-result {
    margin-top: 0;
    padding-left: 0;
}
Include the HeroSearch component in the Dashboard just above the
<Messages/>component.
As the user types in the search box, an input event binding calls the component's search() method with the new search box value.
Summary
You're at the end of your journey, and you've accomplished a lot.
- You added the necessary dependencies to use HTTP in the app.
- You created a Web API project
- You were introduced to Entity Framework Core
- You configured an in-memory database.
- You refactored HeroService into class library to load heroes from a Web API.
- You extended HeroService to support
post,put,deleteandsearchmethods. - You updated the components to allow adding, editing, and deleting of heroes.
- You created a search component that makes use of a code-behind approach.
This concludes the "Tour of Heroes" tutorial.
Previous: Routing
