Attributions
This tutorial is a derivative of the Angular Tour Of Heroes App and Tutorial under CC BY 4.0..
In this page, you'll expand the Tour of Heroes app to display a list of heroes, and allow users to select a hero and display the hero's details.
Create mock heroes
You'll need some heroes to display. Eventually you'll get them from a remote data server. For now, you'll create some mock heroes and pretend they came from the server.
Open the app.css file and add the following code:
.heroes {
    margin: 0 0 2em 0;
    list-style-type: none;
    padding: 0;
    width: 15em;
}

.heroes li {
    cursor: pointer;
    position: relative;
    left: 0;
    background-color: #EEE;
    margin: .5em;
    padding: .3em 0;
    height: 2em;
    border-radius: 4px;
}

    .heroes li:hover {
        color: #607D8B;
        background-color: #DDD;
        left: .1em;
    }

    .heroes li.selected {
        background-color: #CFD8DC;
        color: white;
    }

        .heroes li.selected:hover {
            background-color: #BBD8DC;
            color: white;
        }
.heroes a {
    color: #333;
    text-decoration: none;
    position: relative;
    display: block;
    width: 250px;
}

.heroes .badge {
    display: inline-block;
    font-size: small;
    color: white;
    padding: 0.8em 0.7em 0 0.7em;
    background-color: #405061;
    line-height: 0.8em;
    position: relative;
    left: -1px;
    top: -4px;
    height: 2.4em;
    margin-right: .8em;
    border-radius: 4px 0 0 4px;
}
Note: in the Angular version of the tutorial, component-specific CSS styles go into separate files which are referenced by the component. This level of CSS encapsulation or isolation is not currently available in Blazor, but is an open issue and looks to be included in .NET 5.
Alter the
@codeblock in theHeroescomponent to look like this:@code { List<Hero> heroes { get; set; } = new List<Hero>{ new Hero { Id = 11, Name = "Dr Nice" }, new Hero { Id = 12, Name = "Narco" }, new Hero { Id = 13, Name = "Bombasto" }, new Hero { Id = 14, Name = "Celeritas" }, new Hero { Id = 15, Name = "Magneta" }, new Hero { Id = 16, Name = "RubberMan" }, new Hero { Id = 17, Name = "Dynama" }, new Hero { Id = 18, Name = "Dr IQ" }, new Hero { Id = 19, Name = "Magma" }, new Hero { Id = 20, Name = "Tornado" } }; }Change the markup section in the Heroes component to look like this:
@page "/heroes"

<h2>My Heroes</h2>
<ul class="heroes">
    @foreach (var hero in heroes)
    {
        <li>
            <span class="badge">@hero.Id</span> @hero.Name
        </li>
    }
</ul>
The code uses a standard C#
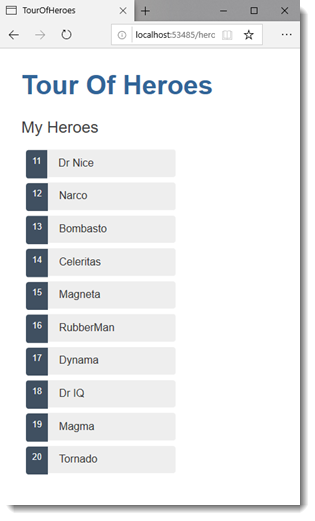
foreachloop embedded in the HTML via Razor to iterate over the collection of heroes and output them as list items in an unordered list.Run the application and navigate to
/heroes. The resulting page should look like this:
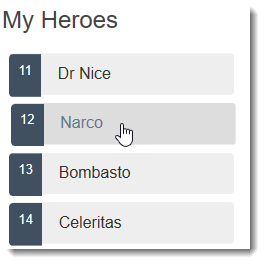
As you hover over each hero, you will notice that it changes appearance.
Master/Detail
When the user clicks a hero in the master list, the component should display the selected hero's details at the bottom of the page. In this section, you'll listen for the hero item click event and update the hero detail.
Alter the markup section in the Heroes component to add a click event binding:
@page "/heroes"

<h2>My Heroes</h2>
<ul class="heroes">
@foreach (var hero in heroes)
{
    <li @onclick=@(() => onSelect(hero))>
        <span class="badge">@hero.Id</span> @hero.Name
    </li>
}
</ul>
The click event binding takes the current
herobeing iterated over, and passes it to anonSelectevent handler, which is defined next.Add the following code to the end of the
@codeblock:Hero selectedHero { get; set; } void onSelect(Hero hero) { selectedHero = hero; }The event handler takes the hero instance and assigns it to the newly added
selectedHeroproperty.
Add a details section
Currently, you have a list in the component template. To click on a hero on the list and reveal details about that hero, you need a section for the details to render in the template. Add the following to Heroes component beneath the list section:
@if (selectedHero != null)
{
    <h2>@selectedHero.Name.ToUpper() Details</h2>
    <div><span>Id: </span>@selectedHero.Id</div>
    <div>
        <label>
            Name:
            <input @[email protected] />
        </label>
    </div>
}
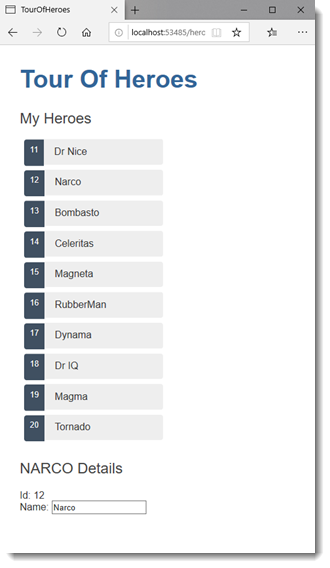
After the browser refreshes, the list of names reappears. The details area is blank. Click a hero in the list of heroes and its details appear. The app seems to be working again. The heroes appear in a list and details about the clicked hero appear at the bottom of the page:
Why it works
When selectedHero is null, the if statement doesn't execute, so no HTML is rendered for the selectedHero details. There are no selectedHero bindings to consider.
When the user picks a hero, selectedHero has a value and the HTML is rendered accordingly.
Style the selected hero
It's difficult to identify the selected hero in the list when all <li> elements look alike.
If the user clicks "Magneta", that hero should render with a distinctive but subtle background color like this:
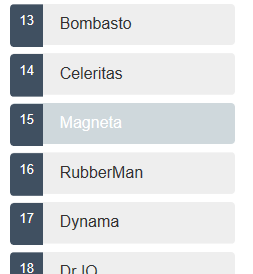
That selected hero colouring is the work of the .selected CSS class in the styles you added earlier. You just have to apply the .selected class to the <li> when the user clicks it.
Being able to embed C# expressions via Razor into HTML makes it easy to add and remove a CSS class conditionally. Just add a conditional or ternary operator to the attribute you want to set conditionally:
class="@(hero == selectedHero ? "selected" : "")"
This code is a shorthand representation of an if...else statement. It says, "if the current hero is the selectedHero, render "selected" as a value for the class attribute, else render an empty string".
The finished <li> looks like this:
<li @onclick=@(e => onSelect(hero)) class="@(hero == selectedHero ? "selected" : "")">
Summary
- The Tour of Heroes app displays a list of heroes in a Master/Detail view.
- The user can select a hero and see that hero's details.
- You used
foreachto display a list. - You used
ifto conditionally include or exclude a block of HTML. - You can toggle a CSS style class with embedded Razor.
Previous: The Hero Editor
Next: Master/Detail Components
